Thursday, August 26, 2010

My first bake sale contribution


My oldest daughter started kindergarten a couple weeks ago and it is a completely new world for the both of us. I am still getting used to the homework, piles of papers that come home everyday and all the upcoming school activities that need parent participation.
Tonight is back-to-school night and the PTA asked the parents to donate items for the bake sale. I originally planned on mini cheesecakes but we are going through a heat wave and I didn't feel like turning on my oven when it's 108 degrees outside. In addition, I imagined a table already filled with several types of brownies, cookies, muffins, cakes and pies and figured I'd try to contribute something other than those. Did I mention we've had triple digit weather all week and I did not want to turn on the oven?
I decided to turn to my beloved chocolate candy melts and I just happened to have some pretzels handy. I didn't feel like I had enough pretzels so I went out and bought cookies and dipped those as well.

I printed out circle tags from Paper Glitter and attached them to the pretzel and cookie bags. She has a couple free school themed circle tags and I chose the pencil design. You can download it here.

So here it is, my first contribution to a school bake sale. I'm sure this will be the first of many in my adventures through my kids' education.

Tuesday, August 24, 2010

{DIY} Free printable boxes


So I just stumbled upon this really awesome site, Paper Box World that offers free downloadable templates of really cute boxes in several themes. I am so excited to share this discovery. These would make really cute favor boxes or even gift boxes. All you have to do is download the FREE files and print on heavy card stock. For projects like these I have the files printed at Staples for around $1 per sheet because they have a variety of card stock to choose from and it doesn't work my printer so much. With a little cutting and gluing you'll have some really cute boxes you can use as decorations, centerpieces or favors. Here's the link to the site again and I hope all of you enjoy this as much as I do.


photos from: Paper Box World

Wednesday, August 18, 2010

Trash to Treasure Fashion: 365 days, 365 dresses for $365


In the spirit of Julie & Julia, Marisa Lynch is taking on a year-long project of buying fashion disaster dresses at thrift stores for $1 each and transforming a dress a day into a creation fit for any fashionista.

Talk about trash to treasure, she's created some really cute pieces fit to be sold at the designer stores. Check a couple of my favorites, day 261, 184 and 178.

What a creative way to go green, make use of thrift store & garage sale finds and utilize talents on the sewing machine!

You can read the article on her project here and follow her blog here.

This would also be an awesome project to do with clothes already in your closet.

photos from: newdressaday.wordpress.com

Saturday, August 14, 2010

{DIY} Nesting box envelope holder


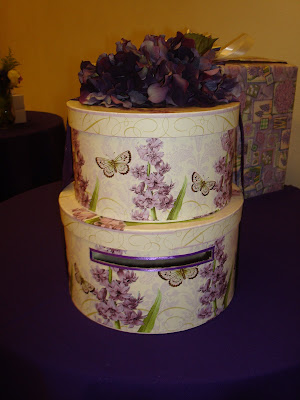
For my cousin's wedding, I wanted to make a container where guests could put their monetary gifts and gifts cards. Back when I got married, the money box my mother-in-law purchased cost around $30 which in hindsight I think is way overpriced. Since then, I've found that hat boxes, nesting boxes and plain gift boxes can easily be glammed up to become a more cost effective and creative way to hold cards and gift cards.


This would also be great for guests to insert recipes or advice cards at a wedding or baby shower. Just make sure you label each box accordingly.

I found these boxes at Home Goods for $9 ( $5 for the larger one and $4 for the smaller one). The flowers were $4 on sale at Michael's and the ribbon was about $3, making the project cost about $16. Not too bad considering some wedding envelope boxes I've seen cost between $30 and $100.

you will need:

boxes in 2-3 different sizes depending on how many tiers you want
ribbon
hot glue
X-acto blade/knife
embellishments such as artificial flowers or rhinestones

1. using the x-acto knife, carefully cut out a slot for the envelopes to be inserted. Make sure the slot is big enough to accommodate large cards.

(steps 1 & 2)

2. Cover the slot edges by gluing thin ribbon around the edges

3. Squirt a round of hot glue on the bottom of the smaller box and quickly place on the top of the larger box

4. wrap both boxes with ribbon


5. glue artificial flowers to the op of the smaller box.


* If you're using plain gift boxes, wrap the boxes in gift wrap matching your theme before proceeding with step 1 and your container will look like a stack of gifts!

Wednesday, August 11, 2010

I've been featured!

Check out my interview posted on The DC Ladies on throwing successful children's parties!

Tuesday, August 10, 2010

Back to School Free Printables | Living Locurto - FREE Printables, recipes, party ideas and crafts.

My daughter starts kindergarten this week and I was looking for some printables I could use to label her things, put in her bag, etc. and of course I turned to one of my favorite blogs, Living Locurto. This site is awesome! She compiled links to FREE printables, some are her own design and others from various other sites. Enjoy.

Back to School Free Printables Living Locurto - FREE Printables, recipes, party ideas and crafts.

Monday, August 9, 2010

ADULT PARTY: Alvin and Kara's reception


My cousin Alvin and his wife Kara were married in Shelley, Idaho two weeks ago and I am so glad we took the road trip to attend their celebration there. Their reception, held in Kara's parents' backyard, was absolutely darling. Here are some pictures from their Idaho reception.

This adorable sign welcomed guests


Isn't this the cutest ride ever?


White paper lanterns and purple flowers decorated the area


Kara's mom Lori made this beautiful cake. The bottom tier is actually made from Rice Krispy Treats!


My aunt hosted a dinner here in California this past weekend for those who didn't take the road trip. I am so thankful she actually trusted me with helping with her. My ideas can get crazy, overboard or overambitious at times and I'm grateful she went with them and as a result I have some projects to share! For this celebration, I helped out with flower arrangements, napkin rings, envelope holder and favors.


I'll be posting DIY pics and instructions this week!