Monday, July 26, 2010

{DIY} Flower headbands


I almost feel silly even posting this super easy DIY project because it's so east you don't even really need instructions but here it is anyway.

On Friday I took my girls to the mall where we saw these cute flower headbands being sold at an accessory store. My girls tried on the headbands and looked so adorable. I was about to buy each of them a headband ( $4 each) but decided that making them ourselves would be a better route.
First, we are always trying to teach our girls about money. I explained to them that for the price of one headband we could make a few of our own for less. Second, if we made them ourselves, they could customize them because they get to choose their own flower colors. Lastly, I saw it as another craft we could do together.

A quick trip to the Dollar Store yielded us 6 headbands ( 2, 3-pack headbands) and 2 types of flower bunches for a total of $4.

Our custom headbands took literally minutes to make. The girls were so excited to pick which flowers go with which band. They were also excited to have 3 headbands each instead of the 1 we would've bought.

Instead of simply buying the ones at the store, we had an impromptu craft that my girls enjoyed.

I think these would make a great addition to a tea party, dress-up or fairy party and could double as adorable favors. They would also be great for flower girls at weddings with the use of fancier flowers and the addition of other embellishments.


To make these flower bands you will need:

  • Artificial flowers
  • headbands
  • hot glue gun

Remove the flower from the stem and trim off any extra plastic that may be sticking out

Add a pea sized drop of glue to the headband


stick the flower to the side of the headband and hold for about a minute until it sets


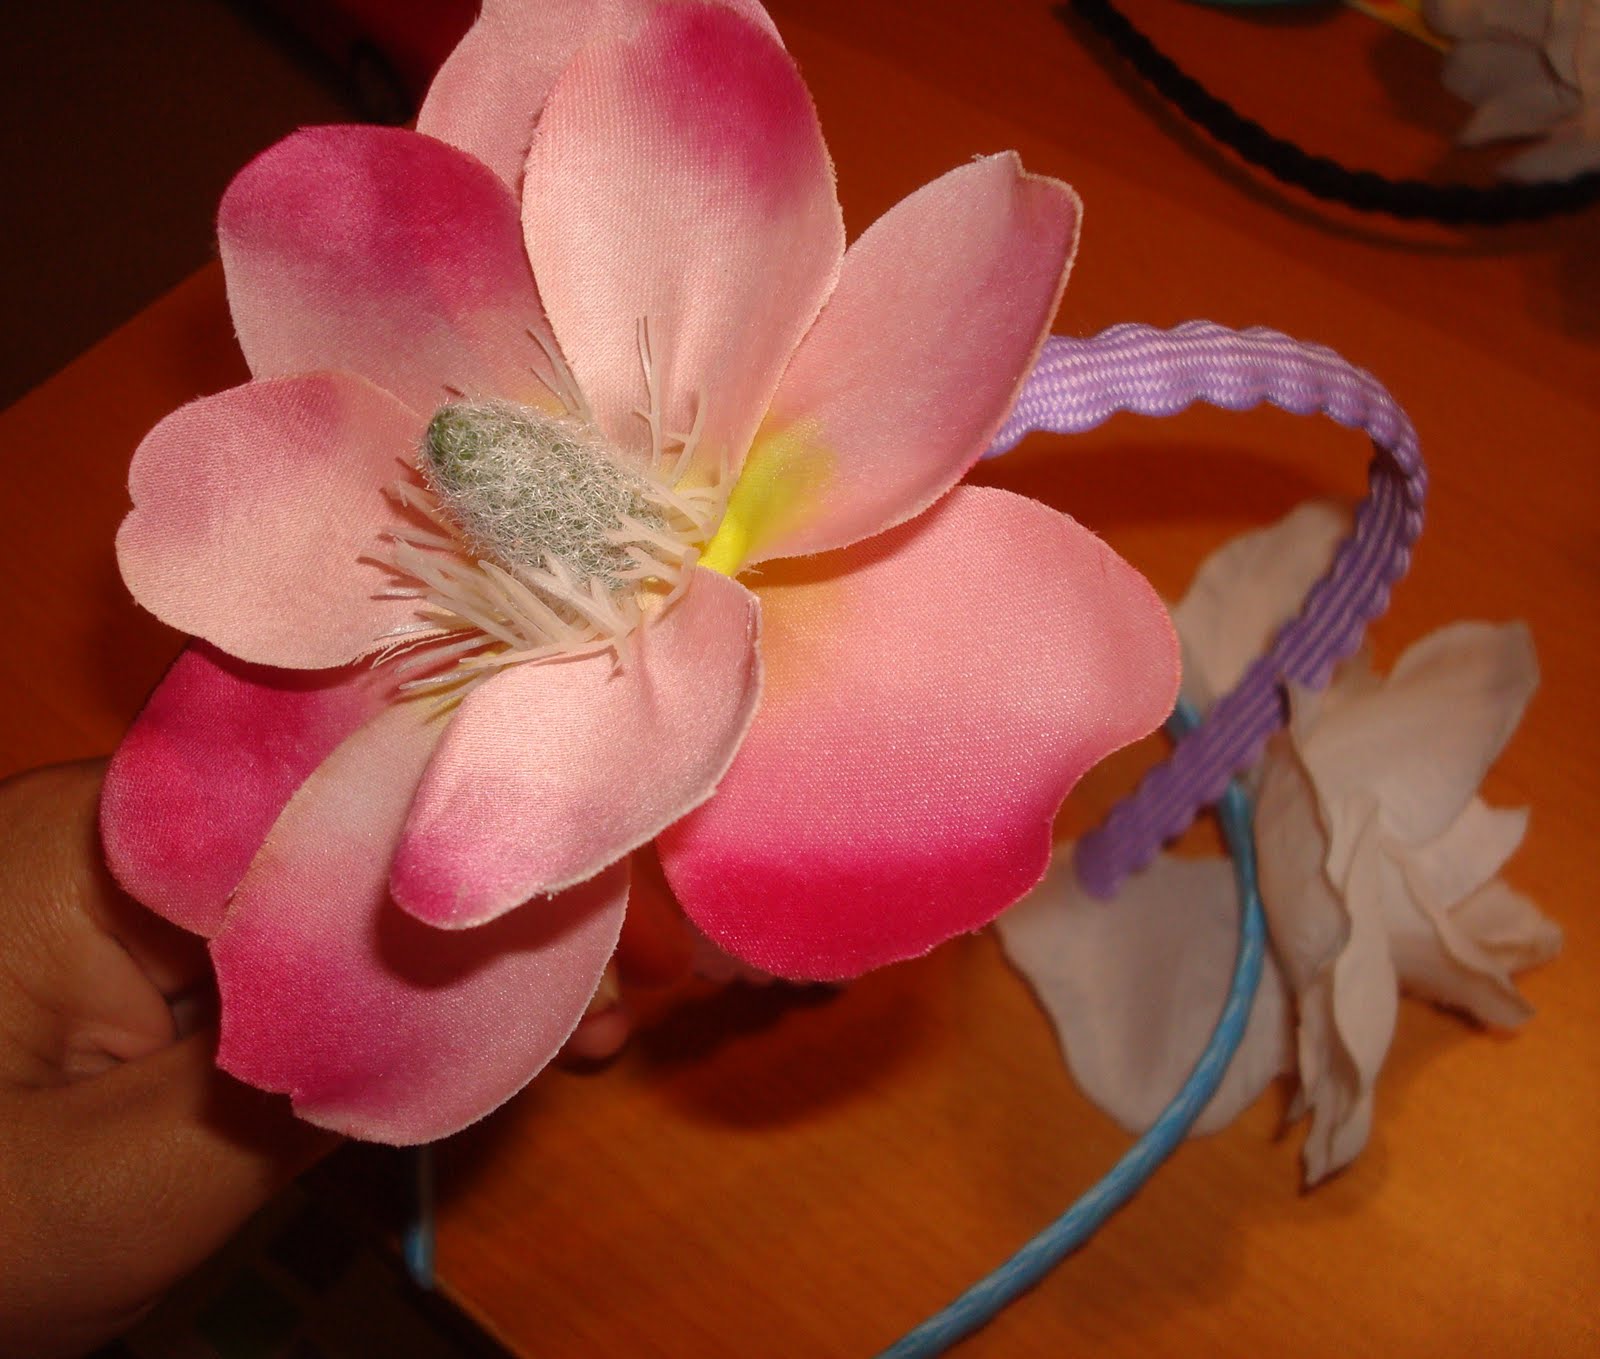
See, I told you it was super easy!


Friday, July 23, 2010

{DIY} Wine cork card holders


My friend Heather ( you can follow her blog at Bicoastal Bride) recently had a beautiful wedding that included several DIY projects. These simple and classy escort card holders were so adorable I just had to share them with you.

Heather says she and her fiance Stephen wanted to reflect their California roots and love of wine in their "California Romance" themed wedding. However, with ready-made wine cork escort card holders costing around $2 each, they decided to make this a DIY project.

For their project, they bought a package of 100 corks with a preprinted grapevine design for $15 from Winemakers Depot. While they had a lot of fun making these holders, Heather advises not waiting until the last minute to do this project as it took them a few months to complete it.

I think these would also work well at a wine and cheese party, adult birthday party, engagement party or bridal shower. They can hold place cards or cards labeling food and drinks.


Heather was kind enough to share instructions on how to make these beautiful card holders.


You will need:

a small hand saw
small vice to hold the corks in place
protective gloves and glasses
corks
small sharp knife
permanent markers


Directions:


* Please wear protective gloves and glasses when working with sharp objects*

1. secure the cork tightly in the vice
2. using the hand saw, cut the cork in half lengthwise
3. using the knife, cut a slit on top of the cork long enough to hold your card
4. decorate the cork as desired with markers


What a wonderful project! Thank you Heather for sharing!


photos: Alex Neumann Photography

Tuesday, July 20, 2010

The Amazing Glass Jar


My kitchen cabinet holds an amazing treasure- a collection of glass jars waiting to be reused and repurposed. Every time I empty a jar of pasta sauce, the crafter/ eco-conscious/ semi-hoarder in me says not to throw them away. I know there are plenty of uses for them, I just had to find those ideas.

My main purpose for glass jars is storing used frying oil. Once I fill a jar with oil, I toss it in the trash. Kind of a waste of a perfectly good jar, I know.

My last issue of Family Fun magazine had a great article on meals in a jar. It's the perfect outdoor meal that the kids will enjoy putting together. They used canning jars for their meals so I'm not sure if my pasta jars will work but it's still a great idea worth sharing. They had recipes for omelets in a jar and cakes in a jar.

Determined to find more uses for these jars, I asked my always crafty and creative friends on Blog Frog for ideas. The response was amazing and they also came up with some great projects for reusing glass jars. Here are some of my ideas and their suggestions for reusing jars.

Serving:
1. Use the jars as drinking glasses. Perfect for a western or outdoor themed party. Check out this cowboy themed baby shower on Hostess With the Mostess where they used jars as drinking glasses.


2. Fill with salsas, relishes and sauces at parties.


3. Fill with candy and place on your desk at the office.


Storage:
1.In the kitchen store dry foods such as pasta, beans or cereal. You can even label the jars with vinyl lettering with instructions from Martha Stewart.


2.In the garage, screw the lids to the bottom of a board. fill the jar with small items like nails, bolts, etc. then screw the jar back to the lid.

3.In the craft room, fill with scrapbooking embellishments, buttons, threads.

4. In the office, use as a pen/pencil holder or fill with paper clips and other supplies.


Crafts:
1.Responsibility jar for kids-- decorate the jar then fill with a marble each time they make a good decision or complete chores. Once the jar is filled, they can receive a reward.

2.Use as a candle / votive holder

3. Group jars of various sizes together and use as flower vases.

4. Create a fairy jar

5. There are several science experiments to do with the kids using glass jars. Martha Stewart has a few ideas here.


Gifts:
1.Cookie mix in a Jar- fill the jar in layers with the dry ingredients needed for a cookie recipe. Cover the lid with fabric, tie with a ribbon along with instructions on adding the wet ingredients.

2. Mix your own bbq sauce or salsa. attach your own personalized label and ribbon to finish the look

3.Hot glue jelly beans to the lid and seal with mod podge. Tie a ribbon around the edge of the lid. Fill with jelly beans.


4. Fill with bath salts. Cover the lid with fabric and a ribbon coordinating with the color of the bath salts


So which idea will you try at home? Got a glass jar project we didn't cover? Post it here!

Thursday, July 15, 2010

And the winner is...

Annette Fay ( Mommy Spirit) will receive a copy of my new favorite book Along Came You.

Thanks to all those who participated in my first giveaway!

Tuesday, July 13, 2010

The plain white box- you are my Everest


So I'm doing favors for my cousin's wedding. I've decided to take on the plain white box. Versatile, fits all occasions and a blank canvas for great things, I'm really hoping a creative light bulb will ding in my head soon. I bought these at Michael's-- $10 ($19.99 with my 50% off coupon of course) and I want to do something different, cute, amazing and yet affordable. I'm really hoping for more than just a bow around it.

I have round tags that I've already printed that I may or may not use.
Any ideas/ suggestion / tips on what I should do?
Stay tuned to see what I end up with.

Check it out: pink and green turtle baby shower

Take a look at this adorable baby shower from Kara's Party Ideas
kara's party ideas: pink and green turtle baby shower

Saturday, July 10, 2010

{Fun for the kids} Homemade play dough


With summer in full swing, I'm sure many of you are looking for easy and affordable ways to entertain the kids. One of the things my girls love to do is make our own play dough. I love it because everything I need is already in my kitchen cupboard and I can just throw it out when we're done. It's easy, cheap and stirs up their imagination.

I use the recipe my daughter's preschool gave us and I like the texture better than store bought play dough because it's softer and it doesn't have that smell that comes with the store bought kind. I also like how we can color it to whatever color we feel like that day and even add our own oils and extracts to make it smell nice. I'm not sure how long the batch will keep. We usually throw ours out after a couple of days.

This is a great activity for parties or play dates though I suggest already whipping up a big batch before the kids arrive. For smaller groups, you can have the kids help measure the ingredients and add their own color and extracts. Then provide rolling pins, plastic cookie cutters, silicone baking cups, etc and let the kids create! I think this would also be a great party favor. Divide the dough into sandwich bags or plastic containers and add a plastic cookie cutter.


Recipe:
2 cups flour
1/2 cup salt
2 tablespoons cream of tartar
2 tablespoons oil
2 cups water
optional: a few drops each of food coloring, flavor extracts

Directions:
In a shallow pan, mix the first three ingredients together then add oil and water. Cook on medium- high heat until you get the play dough consistency. Add coloring and extracts

* My girls love to add the coloring themselves so I usually turn off the heat when the consistency is still a bit wet. I wait until it's cool enough to touch but still a bit warm then I put a glob of the dough on a paper plate and let the girls add the coloring then they mix it in with their hands.


Friday, July 9, 2010

GIVEAWAY: Along Came You


Okay moms of daughters, this one is for you. Along Came You is about a mom who tells her little girl how her life has changed since motherhood. This heartwarming book chronicles what we go through when we take on the most important job of our lives, from how we decorate our house to how we eat our breakfast.


I came across this wonderful book through the book order club at my daughter's school. I ordered one copy for me, read it once and fell in love with it. I wanted to share it with my other mommy friends so I bought several more copies. It's one of those books that will leave a soft spot in your heart and will be a favorite bedtime read.


This giveaway isn't sponsored by an outside company, the author or the publisher.

I bought copies to give as gifts and I would like to share one copy with you.


You can enter three different ways. Do all three and increase your chances!


1. Become a follower of this blog then leave a comment on this post telling us what changed most about you after motherhood.


2. Like us on Facebook (and leave a separate comment here saying you did)


3. Follow me on Blog Frog (and leave a comment here saying you did.)


Contest ends Tuesday, July 13 at midnight and I will randomly choose a winner.

The copy I will send you is a paperback version. If you want a copy sooner I highly recommend going out and getting one, it really is a wonderful read.


Thursday, July 8, 2010

New name, Still me

So I've decided to change this blog's name. Mommy Ces was something I wanted to use to write about my adventures with motherhood. I may still do that eventually but I figured this blog is about my love for celebrations, crafts and other fun things and the name should reflect that.

Thanks for the support everyone.

Wednesday, July 7, 2010

My first order

My first order has been completed. I must admit it was definitely a good learning experience. As much as I enjoy making favors and my chocolates, I must admit there was a different feeling doing it for someone I didn't know. I never really thought of what my time is worth in the past since it was always a labor of love.

I had a real deadline this time, unlike when I do it for friends and family, where I work at a leisurely pace, in between chores and I don't really think of the possibility of an unhappy customer.
This was also a good test for my cost / profit margin if I were to sell my products and services. I'm still on the fence about how much to charge and would really appreciate some input.
Overall, I'm happy with the way they turned out. What do you think?

Personalized dipped pretzels


White chocolate butterfly crunch

...with a personalized sticker on the back


 pink and purple flowers

Tuesday, July 6, 2010

How much would you pay?

When I started this blog, my main goal was to create a place where I could share my love for the things I create and put together. If I received enough interest and positive feedback, I would eventually open up shop on Etsy.
So last week, a friend of a friend saw some the work I've done and contacted me about ordering some candy. YAY, my first real customer! I've always done invitations, candy, flowers willingly and passionately for friends and family, but never for a fee. For this order, I pretty much charged my cost. I figured I could use the pictures to share with all of you, plus it would be good practice for me to see how much time and money a "real"  candy order would take.
Now I need some feedback. Below are pictures of some of the things I've done. I am able to do almost any shape and color candy to match a party theme. How much would YOU be willing to pay for my homemade lollipops & candy? How much would you be willing to pay for a complete candy buffet display?

Any feedback, advice, personal experience would be great.
Thanks!

Pirate & treasure pops


Graduation pops


It's a Boy pops


Butterfly white chocolate crunch


Sugar pops


Flower pops

Thursday, July 1, 2010

GIVEAWAY: A sweet givaway from Milan Maternity

Milan Maternity is giving away 3 different prizes!
 you can win:

1.A $100 E-Gift Card to Milan Maternity


2.A $100 E-Gift Card to Babies 'R' Us

3.A $50 Gift Card to Applebee's and 2 movie tickets to Regal Entertainment theaters
 
check it out at http://milanmaternity.blogspot.com/

SNEAK PEEK: Alvin & Kara's wedding

I'm helping my aunt throw a party to celebrate my cousin's upcoming marriage.
My cousin Alvin and his fiance Kara are getting married in Idaho Falls, ID but we will be having a party here in the Los Angeles area for friends and family who can't make it to the festivities in Idaho.
I happily volunteered to help with a few things and this is one of the things I'm working on.